Configuring SRIOV Intel E810 NIC with GitOps Zero Touch Provisioning

Configuring SRIOV Intel E810 NIC with GitOps Zero Touch Provisioning.⌗
In this tutorial, we will see the different steps to use GitOps Zero Touch Provisioning (ZTP), to configure Intel E810 NICs. First of all, we provision the server as a Single Node Openshift. SNO, it is specially designed for Telcos, to deploy their RAN workloads. These servers made use of these special cards, for high network performance. The tutorial covers:
-
Deploy an Single Node Openshift with ZTP
-
Checking your E810 available cards and ports
-
Automatically configure your SNO. Specially, the E810 cards with ZTP
-
Testing the E810 card
The SNO is an HPE DL380 server with different Intel E810 cards.
We deploy the SNO using Red Hat ZTP (Zero Touch Provisioning). Which is based on ACM (Advanced Cluster Management), ArgoCD (to sync a git repository with an Openshift/Kubernetes cluster) and a set of tools called ZTP. These tools provide two new CRs, in charge of defining deployments and configurations.
Finally, with the cluster deployed and the SRIOV cards configured, we will run some tests.
The tutorial is based on previous work done by Alberto Losada and this Red Hat tutorial. Here, the main differences are: the hardware used, and the Gitops ZTP workflow for deploying and configuring.
Deploy an SNO using ZTP SiteConfig⌗
If you are familiar with ZTP, you will see that the SiteConfig is pretty usual. It just contains the basic configuration to deploy an SNO.
If you are not familiar with ZTP, you will find more info here. But basically, you can see that SiteConfig defines your cluster deployment. Later, ArgoCD and ACM will start the cluster deployment.
---
apiVersion: ran.openshift.io/v1
kind: SiteConfig
metadata:
  name: "intel-1-sno-1"
  namespace: "intel-1-sno-1"
spec:
  baseDomain: "hubcluster-1.lab.eng.cert.redhat.com"
  pullSecretRef:
    name: "assisted-deployment-pull-secret"
  clusterImageSetNameRef: "img4.10.30-x86-64-appsub"
  sshPublicKey: "ssh-rsa AAAAB3....gs= jgato@provisioner.el8k.hpecloud.org"
  clusters:
  - clusterName: "intel-1-sno-1"
    clusterLabels:
      common: "true"
      du-profile-4.10: ""
      sites : "intel-1-sno-1"
    networkType: "OVNKubernetes"
    clusterNetwork:
      - cidr: 10.136.0.0/14
        hostPrefix: 23
    machineNetwork:
      - cidr: 192.168.24.0/25
    serviceNetwork:
      - 172.31.0.0/16
    additionalNTPSources:
      - 192.168.24.80
    nodes:
      - hostName: "intel-1-sno-1.hubcluster-1.lab.eng.cert.redhat.com"
        role: master
        bmcAddress: redfish-virtualmedia://<BMC_IP>/redfish/v1/Systems/1
        bmcCredentialsName:
          name: "intel-1-sno-1-bmc-secret"
        bootMACAddress: "94:40:c9:c1:eb:48"
        bootMode: "UEFI"
        rootDeviceHints:
          deviceName: /dev/sda
        nodeNetwork:
          config:
            interfaces:
              - name: eno5
                type: ethernet
                state: up
                ipv4:
                  enabled: true
                  dhcp: false
                  address:
                    - ip: <SERVER_IP>
                      prefix-length: 25
                ipv6:
                  enabled: false
            dns-resolver:
              config:
                server:
                  - <DNS>
            routes:
              config:
                - destination: 0.0.0.0/0
                  next-hop-address: <GATEWAY>
                  next-hop-interface: eno5
          interfaces:
            - name: "eno5"
              macAddress: "94:40:c9:c1:eb:48"
Configure the SNO using ZTP PolicyGenTemplates⌗
After deployment, ZTP uses PolicyGenTemplates (PGT) to make different configurations. Like installing different Operators and its configurations.
Here an usual example:
apiVersion: ran.openshift.io/v1
kind: PolicyGenTemplate
metadata:
  name: "common-rangen-4.10"
  namespace: "ztp-common"
spec:
  bindingRules:
    # These policies will correspond to all clusters with this label:
    common: "true"
    du-profile-4.10: ""
  sourceFiles:
    # Create operators policies that will be installed in all clusters
    - fileName: SriovSubscription.yaml
      policyName: "subscriptions-policy"
    - fileName: SriovSubscriptionNS.yaml
      policyName: "subscriptions-policy"
    - fileName: SriovSubscriptionOperGroup.yaml
      policyName: "subscriptions-policy"
    - fileName: PtpSubscription.yaml
      policyName: "subscriptions-policy"
    - fileName: PtpSubscriptionNS.yaml
      policyName: "subscriptions-policy"
    - fileName: PtpSubscriptionOperGroup.yaml
      policyName: "subscriptions-policy"
    - fileName: PaoSubscription.yaml
      policyName: "subscriptions-policy"
    - fileName: PaoSubscriptionNS.yaml
      policyName: "subscriptions-policy"
    - fileName: PaoSubscriptionOperGroup.yaml
      policyName: "subscriptions-policy"
    - fileName: ClusterLogNS.yaml
      policyName: "subscriptions-policy"
    - fileName: ClusterLogOperGroup.yaml
      policyName: "subscriptions-policy"
    - fileName: ClusterLogSubscription.yaml
      policyName: "subscriptions-policy"
    - fileName: StorageNS.yaml
      policyName: "subscriptions-policy"
    - fileName: StorageOperGroup.yaml
      policyName: "subscriptions-policy"
    - fileName: StorageSubscription.yaml
      policyName: "subscriptions-policy"
    - fileName: ReduceMonitoringFootprint.yaml
      policyName: "config-policy"
In the following sections, we will show how to configure the PerformanceProfile and SRIOV operators. These are the keys to configure the server and the Intel E810 card, properly, to run the DPDK packet simulations.
Configuring PerformanceProfile⌗
Using this operator, we will configure a custom Performance Profile on the server. This profile covers some requirements we need, later, for our tests.
-
CPU Pinning: split CPUS for the platform and the workloads (our DPDK SRIOV Tests).
-
Hugepages configuration.
To configure the CPU Pinning, lets see our available CPUS in the server:
$> lscpu
...
...
NUMA node0 CPU(s):   0-23,48-71
NUMA node1 CPU(s):   24-47,72-95
...
...
The ‘,’ separates the CPUS and the sibling. So, hyper threading is enabled. The sibling of each CPU can be obtained:
$> cat /sys/devices/system/cpu/cpu0/topology/core_cpus_list
0,48
$> cat /sys/devices/system/cpu/cpu4/topology/core_cpus_list
4,52
$> cat /sys/devices/system/cpu/cpu12/topology/core_cpus_list
12,60
We use 8 Reserved CPU for platform processes. But having in mind, that we have to pair also the siblings:
-
Take 2 from each NUMA:
-
From NUMA 0: CPUs 0 and 1, and their siblings 48, 49
-
From NUMA 1: CPUs 24 and 25 and their siblings 72,73
-
All the other CPUs go to Isolated CPU pool. These have the lowest latency. Processes in this group have no interruptions and so can, for example, reach much higher DPDK zero packet loss bandwidth.
We also need 32 Hugepages of 1G.
The PGT to create the ‘sno-perfprofile’:
  - fileName: PerformanceProfile.yaml
    metadata:
      annotations:
        kubeletconfig.experimental: |
          {"systemReserved": {"memory": "4Gi"}}
      name: sno-perfprofile
    policyName: perfprofile-policy
    spec:
      additionalKernelArgs:
      - rcupdate.rcu_normal_after_boot=0
      - idle=poll
      cpu:
        isolated: 2-23,26-47,50-71,74-95
        reserved: 0,1,24,25,48,49,72,73
# NUMA node0 CPU(s):   0-23,48-71
# NUMA node1 CPU(s):   24-47,72-95
      globallyDisableIrqLoadBalancing: true
      hugepages:
        defaultHugepagesSize: 1G
        pages:
        - count: 32
          size: 1G
      machineConfigPoolSelector:
        pools.operator.machineconfiguration.openshift.io/master: ""
      nodeSelector:
        node-role.kubernetes.io/master: ""
      numa:
        topologyPolicy: single-numa-node
      realTimeKernel:
        enabled: true
Here the ‘,’ in Isolated and Reserved are just enumerating CPUs.
With the PGT applied, the server will be rebooted. Then, you can ssh the host to see the Performance Profile has been correctly configured:
# cat  /proc/cmdline
BOOT_IMAGE=(hd0,gpt3)/ostree/rhcos-56fabc639a679b757ebae30e5f01b2ebd38e9fde9ecae91c41be41d3e89b37f8/vmlinuz-4.18.0-305.34.2.rt7.107.el8_4.x86_64 random.trust_cpu=on console=tty0 console=ttyS0,115200n8 ignition.platform.id=metal ostree=/ostree/boot.1/rhcos/56fabc639a679b757ebae30e5f01b2ebd38e9fde9ecae91c41be41d3e89b37f8/0 ip=eno5:dhcp root=UUID=1080762e-38cc-49d9-be5c-3b5e70a157ac rw rootflags=prjquota skew_tick=1 nohz=on
rcu_nocbs=2-23,26-47,50-71,74-95
tuned.non_isolcpus=00000300,00030000,03000003 intel_pstate=disable nosoftlockup tsc=nowatchdog intel_iommu=on iommu=pt

isolcpus=managed_irq,2-23,26-47,50-71,74-95

systemd.cpu_affinity=0,1,72,73,48,49,24,25

default_hugepagesz=1G hugepagesz=1G hugepages=32 idle=poll rcupdate.rcu_normal_after_boot=0 nohz_full=4-31,36-95 crashkernel=512M

#  grep HugePages_ /proc/meminfo
HugePages_Total:      32
HugePages_Free:       32
HugePages_Rsvd:        0
HugePages_Surp:        0
#
Configuring SRIOV⌗
With the Operator installed, we will use another PGT to configure our SRIOV Intel E810 cards.
Checking available SRIOV capable NICs⌗
When the SRIOV operator is installed, we can check the available NIC devices:
$> oc get sriovnetworknodestates.sriovnetwork.openshift.io -n openshift-sriov-network-operator  -o yaml
apiVersion: v1
items:
- apiVersion: sriovnetwork.openshift.io/v1
  kind: SriovNetworkNodeState
  metadata:
    creationTimestamp: "2022-08-04T13:25:08Z"
    generation: 2
    name: intel-1-sno-1.hubcluster-1.lab.eng.cert.redhat.com
    namespace: openshift-sriov-network-operator
    ownerReferences:
    - apiVersion: sriovnetwork.openshift.io/v1
      blockOwnerDeletion: true
      controller: true
      kind: SriovNetworkNodePolicy
      name: default
      uid: 92af4999-d2ba-4348-b306-4ed164851cfd
    resourceVersion: "43108570"
    uid: 0c36b30e-0fbd-4602-bda8-9cf04aee97f0
  status:
    interfaces:
    - deviceID: "1657"
      driver: tg3
      linkSpeed: -1 Mb/s
      linkType: ETH
      mac: b4:7a:f1:dc:08:54
      mtu: 1500
      name: eno1
      pciAddress: "0000:02:00.0"
      vendor: "14e4"
    - deviceID: "1657"
      driver: tg3
      linkSpeed: -1 Mb/s
      linkType: ETH
      mac: b4:7a:f1:dc:08:55
      mtu: 1500
      name: eno2
      pciAddress: "0000:02:00.1"
      vendor: "14e4"
...
...
...
    - deviceID: "1593"
      driver: ice
      linkSpeed: -1 Mb/s
      linkType: ETH
      mac: b4:96:91:a3:f2:c3
      mtu: 1500
      name: ens1f3
      pciAddress: "0000:37:00.3"
      totalvfs: 64
      vendor: "8086"
    - deviceID: "1015"
      driver: mlx5_core
      linkSpeed: 25000 Mb/s
      linkType: ETH
      mac: 94:40:c9:c1:eb:48
      mtu: 1500
      name: eno5
      pciAddress: 0000:5d:00.0
      vendor: 15b3
    - deviceID: "1015"
      driver: mlx5_core
      linkSpeed: 25000 Mb/s
      linkType: ETH
      mac: 94:40:c9:c1:eb:49
      mtu: 1500
      name: eno6
      pciAddress: 0000:5d:00.1
      vendor: 15b3

    - deviceID: "1593"
      driver: ice
      linkSpeed: 25000 Mb/s
      linkType: ETH
      mac: b4:96:91:a3:ef:e9
      mtu: 1500
      name: ens4f1
      pciAddress: 0000:86:00.1
      totalvfs: 64
      vendor: "8086"
...
...
...
    - deviceID: "1592"
      driver: ice
      linkSpeed: -1 Mb/s
      linkType: ETH
      mac: b4:96:91:ad:83:c1
      mtu: 1500
      name: ens5f1
      pciAddress: 0000:af:00.1
      totalvfs: 128
      vendor: "8086"
    syncStatus: Succeeded
kind: List
metadata:
  resourceVersion: ""
  selfLink: ""
We are only interested in Intel and E810 NIC Cards for this tutorial.
Some IDs to locate the NICs in the Server:
-
Vendor: 8086 INTEL
-
deviceID: 1889 VFS
-
deviceID: 1593 Ethernet Controller E810-C for SFP (XXVDA4)
-
deviceID: 1592 Ethernet Controller E810-C for QSFP (CQDA4)
-
deviceID: 1657
You can get more about that on devicehunt.
We see there are multiple interfaces. For example, in this server there are 8 interfaces for the Identifier 1593 (E810-C for SFP):
$> oc get sriovnetworknodestates.sriovnetwork.openshift.io -n openshift-sriov-network-operator  -o yaml \
 | grep 1593 -A 9 \
 | grep name
      name: ens1f0
      name: ens1f1
      name: ens1f2
      name: ens1f3
      name: ens4f0
      name: ens4f1
      name: ens4f2
      name: ens4f3
So, there really exist 2 cards (ens1 and ens4) with 4 physical ports each. Therefore, it is like 8 different NICs with their own MACs and configurations. Each one, supporting different virtual ports/interfaces (vfs) to be attached to PODs:
$> oc get sriovnetworknodestates.sriovnetwork.openshift.io -n openshift-sriov-network-operator  -o yaml \
 | grep 1593 -A 9 \
 | grep 'name\|totalvfs'
      name: ens1f0
      totalvfs: 64
      name: ens1f1
      totalvfs: 64
      name: ens1f2
      totalvfs: 64
      name: ens1f3
      totalvfs: 64
      name: ens4f0
      totalvfs: 64
      name: ens4f1
      totalvfs: 64
      name: ens4f2
      totalvfs: 64
      name: ens4f3
      totalvfs: 64
There are another 2 cards (en2 and ens5) for intel deviceID 1592, with 2 ports each.
$> oc get sriovnetworknodestates.sriovnetwork.openshift.io -n openshift-sriov-network-operator  -o yaml \
| grep 1592 -A 9 \
| grep name
      name: ens2f0
      name: ens2f1
      name: ens5f0
      name: ens5f1
But, not all the ports are wired/connected in the 1593 card (linkSpeed -1)
    - deviceID: "1593"
      driver: ice
      linkSpeed: -1 Mb/s
      linkType: ETH
      mac: b4:96:91:a3:ef:ea
      mtu: 1500
      name: ens4f2
      pciAddress: 0000:86:00.2
      totalvfs: 64
      vendor: "8086"
    - deviceID: "1593"
      driver: ice
      linkSpeed: -1 Mb/s
      linkType: ETH
      mac: b4:96:91:a3:f2:c3
      mtu: 1500
      name: ens1f3
      pciAddress: "0000:37:00.3"
      totalvfs: 64
      vendor: "8086"
But the first and second port are connected with 25000 Mb/s:
    - deviceID: "1593"
      driver: ice
      linkSpeed: 25000 Mb/s
      linkType: ETH
      mac: b4:96:91:a3:ef:e8
      mtu: 1500
      name: ens4f0
      numVfs: 8
      pciAddress: 0000:86:00.0
      totalvfs: 64
      vendor: "8086"
    - deviceID: "1593"
      driver: ice
      linkSpeed: 25000 Mb/s
      linkType: ETH
      mac: b4:96:91:a3:ef:e9
      mtu: 1500
      name: ens4f1
      pciAddress: 0000:86:00.1
      totalvfs: 64
      vendor: "8086"
We can do the same for the other Intel Card with id 1592:
> oc get sriovnetworknodestates.sriovnetwork.openshift.io -n openshift-sriov-network-operator  -o yaml | grep 1592 -A 9 | grep 'name\|totalvfs'
      name: ens2f0
      totalvfs: 128
      name: ens2f1
      totalvfs: 128
      name: ens5f0
      totalvfs: 128
      name: ens5f1
      totalvfs: 128
In this case, we have two cards (ens2 and ens5) with two ports each.
    - deviceID: "1592"
      driver: ice
      linkSpeed: -1 Mb/s
      linkType: ETH
      mac: b4:96:91:a4:0a:78
      mtu: 1500
      name: ens2f0
      pciAddress: "0000:12:00.0"
      totalvfs: 128
      vendor: "8086"
    - deviceID: "1592"
      driver: ice
      linkSpeed: -1 Mb/s
      linkType: ETH
      mac: b4:96:91:a4:0a:79
      mtu: 1500
      name: ens2f1
      pciAddress: "0000:12:00.1"
      totalvfs: 128
      vendor: "8086"
    - deviceID: "1592"
      driver: ice
      linkSpeed: -1 Mb/s
      linkType: ETH
      mac: b4:96:91:ad:83:c0
      mtu: 1500
      name: ens5f0
      pciAddress: 0000:af:00.0
      totalvfs: 128
      vendor: "8086"
    - deviceID: "1592"
      driver: ice
      linkSpeed: -1 Mb/s
      linkType: ETH
      mac: b4:96:91:ad:83:c1
      mtu: 1500
      name: ens5f1
      pciAddress: 0000:af:00.1
      totalvfs: 128
      vendor: "8086"
In this case, the 4 ports are disconnected. At this moment, we cannot use that card.
Creating PGT for virtual devices and networks⌗
Now we have a clear picture of the available NICs. Summary:
-
(1592 CQDA4) Ethernet Controller E810-C for QSFP
- ens2 and ens5 with all the ports disconnected
-
(1593 XXVDA4) Intel Ethernet Controller E810-C for SFP
-
ens1f0 connected
-
ens4f0 connected
-
ens4f1 connected
-
ens4f2 disconnected
-
ens4f3 disconnected
-
ens1f1 connected
-
ens1f2 disconnected
-
ens1f3 disconnected
-
We only have 4 available NICs, but we can use SRIOV and VFS to split these cards into multiple network interfaces. These VFs are exposed to be used by PODs with a network attached.
Following, we show an example to get some VFs from ens4f0/ens4f1 and create two networks. These will be the interfaces and networks used in our testing example.
---
apiVersion: ran.openshift.io/v1
kind: PolicyGenTemplate
metadata:
  name: intel-1-sno-1-test-dpdk
  namespace: ztp-site
spec:
  bindingRules:
    name: intel-1-sno-1
  mcp: master
  sourceFiles:
  - fileName: SriovNetworkNodePolicy.yaml
    metadata:
      name: e810-ens4f0
    policyName: sriov-netdevice-policy
    spec:
      deviceType: vfio-pci
      nicSelector:
        deviceID: "1593"
        pfNames:
        - ens4f0
        vendor: "8086"
      numVfs: 8
      resourceName: e810_ens4f0
  - fileName: SriovNetworkNodePolicy.yaml
    metadata:
      name: e810-ens4f1
    policyName: sriov-netdevice-policy
    spec:
      deviceType: vfio-pci
      nicSelector:
        deviceID: "1593"
        pfNames:
        - ens4f1
        vendor: "8086"
      numVfs: 8
      resourceName: e810_ens4f1
  - fileName: SriovNetwork.yaml
    metadata:
      name: sriov-nw-du-test-pmd-e810-ens4f0
    policyName: sriov-nw-test-pmd-policy
    spec:
      ipam: |-
        {
          "type": "host-local",
          "ranges": [[{"subnet": "10.0.30.0/24"}]],
          "dataDir":
            "/run/my-orchestrator/container-ipam-state-1"
        }
      networkNamespace: testpmd
      resourceName: e810_ens4f0
      spoofChk: "off"

  - fileName: SriovNetwork.yaml
    metadata:
      name: sriov-nw-du-test-pmd-e810-ens4f1
    policyName: sriov-nw-test-pmd-policy
    spec:
      ipam: |-
        {
          "type": "host-local",
          "ranges": [[{"subnet": "10.0.40.0/24"}]],
          "dataDir":
            "/run/my-orchestrator/container-ipam-state-1"
        }
      networkNamespace: testpmd
      resourceName: e810_ens4f1
      spoofChk: "off"
After ZTP does all the work, you will see the devices and networks created.
Network devices:
> oc -n openshift-sriov-network-operator get sriovnetworknodepolicies.sriovnetwork.openshift.io
NAME          AGE
default       7d1h
e810-ens4f0   20m
e810-ens4f1   20m
The created networks:
> oc -n openshift-sriov-network-operator get sriovnetwork
NAME                               AGE
sriov-nw-du-test-pmd-e810-ens4f0   38m
sriov-nw-du-test-pmd-e810-ens4f1   38m
and more important, you can see the devices available in the node:
> oc get node master-0.intel-1-sno-1.hubcluster-1.lab.eng.cert.redhat.com \
  -o jsonpath={.status.allocatable} | jq
{
  "cpu": "88",
  "ephemeral-storage": "468283204Ki",
  "hugepages-1Gi": "32Gi",
  "hugepages-2Mi": "0",
  "memory": "157779140Ki",
  "openshift.io/e810_ens4f0": "8",
  "openshift.io/e810_ens4f1": "8",
  "pods": "250"
}
These ‘openshift.io/e810_*’ resources will be requested later in the deployment of TestPMD and TRex (our tests).
Testing configured E810 cards⌗
In this section, we will use a DPDK test application with the configurations created in the previous sections. We will use TRex to generate traffic to a test dpdk (testpmd) application.
*We basically re-use the work done by @alosadagrande from here and this Red Hat Article. *
Important to notice, this time, I am using an Intel E810 (which is supported with Trex 3.0 used later). Previous articles would be using other SRIOV cards.
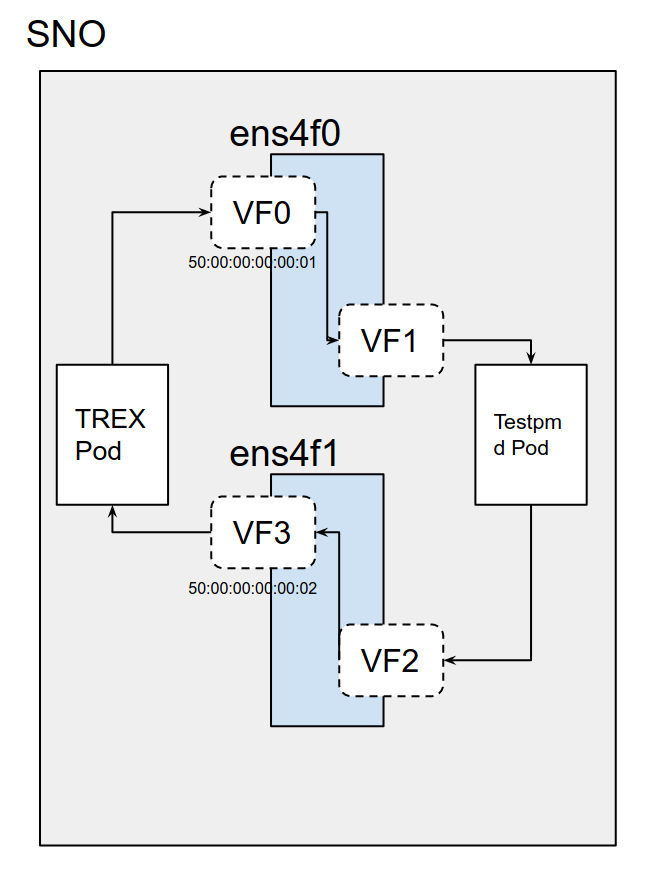
According to the picture, we need 4 different ports. These ports will not be real physical ones, these will be 4 VFS from SRIOV NICs. We have already configured this environment, and the needed VFs and Networks in a section above.
Traffic Generator will send packets from VF0 and this will be received by Testpmd VF1. Then Testpmd will forward packets to the VF2, and from there, it will reach back to Trex on the VF3.
First of all, lets download the deployments for the TestPMD and the Traffic Generator:
We clone the repository:
$> git clone https://github.com/jgato/openshift-telco.git
$> cd openshift-telco/
I am using a forked repository, where I have done some modifications adapted to this tutorial.
Running TestPMD to forward packages⌗
testPMD is an application used to test DPDK in a packet forwarding mode and also to access NIC hardware features such as Flow Director. In our case, TestPMD will basically forward packets between two ports.
Some pre-requirements:
-
PAO configuration: testPMD requires hugepages and guranteed POD.
-
SRIOV configuration:
-
Two SRIOV interfaces
-
Two networks
-
All these requirements have been fulfilled with the PGTs created in the previous versions.
Lets,edit the TestPMD deployment according to our previous configuration:
$> cd test-pmd/
$> vim manifests/deployment-testpmd-rhel.yaml
Configure the yaml to use one VF from ens4f0 and another from ens4f1. We also attach the pods to the previously created networks for these devices (‘k8s.v1.cni.cncf.io/networks’).
apiVersion: apps/v1
kind: Deployment
metadata:
  labels:
    app: testpmd
    app.kubernetes.io/component: testpmd
    app.kubernetes.io/instance: testpmd
  name: testpmd-rhel
  namespace: testpmd
spec:
  replicas: 1
  revisionHistoryLimit: 10
  selector:
    matchLabels:
      app: testpmd
  template:
    metadata:
      labels:
        app: testpmd
      annotations:
        k8s.v1.cni.cncf.io/networks: openshift-sriov-network-operator/sriov-nw-du-test-pmd-e810-ens4f0, openshift-sriov-network-operator/sriov-nw-du-test-pmd-e810-ens4f1
        irq-load-balancing.crio.io: "disable"
        cpu-load-balancing.crio.io: "disable"
    spec:
      runtimeClassName: "performance-performance-sno"
      serviceAccount: deployer
      serviceAccountName: deployer
      securityContext:
        runAsUser: 0
      containers:
        - image: registry.redhat.io/openshift4/dpdk-base-rhel8
          command:
          - /bin/bash
          - -c
          - sleep INF
          securityContext:
            runAsUser: 0
            capabilities:
              add: ["IPC_LOCK","SYS_RESOURCE","NET_RAW","NET_ADMIN"]
          imagePullPolicy: Always
          env:
            - name: RUN_TYPE
              value: "testpmd"
          name: testpmd
          terminationMessagePath: /dev/termination-log
          terminationMessagePolicy: File
          resources:
            limits:
              cpu: "16"
              hugepages-1Gi: 8Gi
              memory: 2Gi
              openshift.io/e810-ens4f0: "1"
              openshift.io/e810-ens4f1: "1"
            requests:
              cpu: "16"
              hugepages-1Gi: 8Gi
              memory: 2Gi
              openshift.io/e810-ens4f0: "1"
              openshift.io/e810-ens4f1: "1"
          volumeMounts:
            - mountPath: /mnt/huge
              name: hugepage
      dnsPolicy: ClusterFirst
      volumes:
      - name: hugepage
        emptyDir:
          medium: HugePages
      restartPolicy: Always
  test: false
With this configuration, the POD will be connected to three networks and three network devices. Two of these devices are the SRIOV VFs on different ports of the card: ‘“pci-address”: “0000:86:09.2”’ and ‘“pci-address”: “0000:86:01.5”’
metadata:
  annotations:
    irq-load-balancing.crio.io: disable
    k8s.ovn.org/pod-networks: '{"default":{"ip_addresses":["10.136.0.252/23"],"mac_address":"0a:58:0a:88:00:fc","gateway_ips":["10.136.0.1"],"ip_address":"10.136.0.252/23","gateway_ip":"10.136.0.1"}}'
    k8s.v1.cni.cncf.io/network-status: |-
      [{
          "name": "ovn-kubernetes",
          "interface": "eth0",
          "ips": [
              "10.136.0.252"
          ],
          "mac": "0a:58:0a:88:00:fc",
          "default": true,
          "dns": {}
      },{
          "name": "testpmd/sriov-nw-du-test-pmd-e810-ens4f0",
          "interface": "net1",
          "ips": [
              "10.0.30.8"
          ],
          "dns": {},
          "device-info": {
              "type": "pci",
              "version": "1.0.0",
              "pci": {
                  "pci-address": "0000:86:01.5"
              }
          }
      },{
          "name": "testpmd/sriov-nw-du-test-pmd-e810-ens4f1",
          "interface": "net2",
          "ips": [
              "10.0.40.8"
          ],
          "dns": {},
          "device-info": {
              "type": "pci",
              "version": "1.0.0",
              "pci": {
                  "pci-address": "0000:86:09.2"
              }
          }
      }]
The Deployment will create a Pod with the tools to use a DPDK test application. This test application will just forward what it receives by its Port 0 to its Port 1. Port 0 and 1 are the VFS 1 and 2 in the figure above.
The test application will also collect metrics about the packets received/transmitted.
> oc apply -f manifests/deployment-testpmd-rhel.yaml
deployment.apps/testpmd-rhel created
The Deployment would take some time, in order to create the ’network-attachment-definitions’. These are created because of the ‘SriovNetwork’ created previously. These were configured to point to the ’testpmd’ namespace.
Once the Deployment is created, we can rsh there.
To run the testpmd is important to define two different peers. It will forward only what it came from peer 50:00:00:00:00:01 to peer 50:00:00:00:00:02. Later, we will configure TREX Ports with these MAC addresses:
$> oc rsh testpmd-rhel-6789767d85-tx4z8
sh-4.4# export CPU=$(cat /sys/fs/cgroup/cpuset/cpuset.cpus)
sh-4.4# testpmd -l ${CPU} -a ${PCIDEVICE_OPENSHIFT_IO_E810_ENS4F0} -a ${PCIDEVICE_OPENSHIFT_IO_E810_ENS4F1} \
-n 4 -- -i --nb-cores=15 --rxd=4096 --txd=4096 --rxq=7 --txq=7 --forward-mode=mac \
--eth-peer=0,50:00:00:00:00:01 --eth-peer=1,50:00:00:00:00:02
EAL: Detected 96 lcore(s)
EAL: Detected 2 NUMA nodes
EAL: Multi-process socket /var/run/dpdk/rte/mp_socket
EAL: Selected IOVA mode 'VA'
EAL: No available hugepages reported in hugepages-2048kB
EAL: Probing VFIO support...
EAL: VFIO support initialized
EAL:   using IOMMU type 1 (Type 1)
EAL: Probe PCI driver: net_iavf (8086:1889) device: 0000:37:01.2 (socket 0)
EAL: Probe PCI driver: net_iavf (8086:1889) device: 0000:37:09.2 (socket 0)
EAL: No legacy callbacks, legacy socket not created
Interactive-mode selected
Set mac packet forwarding mode
testpmd: create a new mbuf pool <mb_pool_0>: n=267456, size=2176, socket=0
testpmd: preferred mempool ops selected: ring_mp_mc
Configuring Port 0 (socket 0)
iavf_configure_queues(): RXDID[1] is not supported, request default RXDID[1] in Queue[0]
iavf_configure_queues(): RXDID[1] is not supported, request default RXDID[1] in Queue[1]
iavf_configure_queues(): RXDID[1] is not supported, request default RXDID[1] in Queue[2]
iavf_configure_queues(): RXDID[1] is not supported, request default RXDID[1] in Queue[3]
iavf_configure_queues(): RXDID[1] is not supported, request default RXDID[1] in Queue[4]
iavf_configure_queues(): RXDID[1] is not supported, request default RXDID[1] in Queue[5]
iavf_configure_queues(): RXDID[1] is not supported, request default RXDID[1] in Queue[6]

Port 0: link state change event

Port 0: link state change event

Port 0: link state change event

Port 0: link state change event

Port 0: link state change event

Port 0: link state change event

Port 0: link state change event

Port 0: link state change event

Port 0: link state change event

Port 0: link state change event

Port 0: link state change event

Port 0: link state change event

Port 0: link state change event

Port 0: link state change event
Port 0: 62:B9:05:82:48:DB
Configuring Port 1 (socket 0)
iavf_configure_queues(): RXDID[1] is not supported, request default RXDID[1] in Queue[0]
iavf_configure_queues(): RXDID[1] is not supported, request default RXDID[1] in Queue[1]
iavf_configure_queues(): RXDID[1] is not supported, request default RXDID[1] in Queue[2]
iavf_configure_queues(): RXDID[1] is not supported, request default RXDID[1] in Queue[3]
iavf_configure_queues(): RXDID[1] is not supported, request default RXDID[1] in Queue[4]
iavf_configure_queues(): RXDID[1] is not supported, request default RXDID[1] in Queue[5]
iavf_configure_queues(): RXDID[1] is not supported, request default RXDID[1] in Queue[6]

Port 1: link state change event

Port 1: link state change event

Port 1: link state change event

Port 1: link state change event

Port 1: link state change event

Port 1: link state change event

Port 1: link state change event

Port 1: link state change event

Port 1: link state change event

Port 1: link state change event

Port 1: link state change event

Port 1: link state change event

Port 1: link state change event

Port 1: link state change event
Port 1: 4E:88:D9:B9:80:31
Checking link statuses...
Done
testpmd>
Set promiscuous mode off:
testpmd> set promisc all off
Everything seems ok. But no many traffic there yet:
testpmd> start
mac packet forwarding - ports=2 - cores=14 - streams=14 - NUMA support enabled, MP allocation mode: native
Logical Core 5 (socket 0) forwards packets on 1 streams:
  RX P=0/Q=0 (socket 0) -> TX P=1/Q=0 (socket 0) peer=50:00:00:00:00:02
Logical Core 6 (socket 0) forwards packets on 1 streams:
  RX P=1/Q=0 (socket 0) -> TX P=0/Q=0 (socket 0) peer=50:00:00:00:00:01
Logical Core 7 (socket 0) forwards packets on 1 streams:
  RX P=0/Q=1 (socket 0) -> TX P=1/Q=1 (socket 0) peer=50:00:00:00:00:02
Logical Core 8 (socket 0) forwards packets on 1 streams:
  RX P=1/Q=1 (socket 0) -> TX P=0/Q=1 (socket 0) peer=50:00:00:00:00:01
Logical Core 9 (socket 0) forwards packets on 1 streams:
  RX P=0/Q=2 (socket 0) -> TX P=1/Q=2 (socket 0) peer=50:00:00:00:00:02
Logical Core 10 (socket 0) forwards packets on 1 streams:
  RX P=1/Q=2 (socket 0) -> TX P=0/Q=2 (socket 0) peer=50:00:00:00:00:01
Logical Core 11 (socket 0) forwards packets on 1 streams:
  RX P=0/Q=3 (socket 0) -> TX P=1/Q=3 (socket 0) peer=50:00:00:00:00:02
Logical Core 52 (socket 0) forwards packets on 1 streams:
  RX P=1/Q=3 (socket 0) -> TX P=0/Q=3 (socket 0) peer=50:00:00:00:00:01
Logical Core 53 (socket 0) forwards packets on 1 streams:
  RX P=0/Q=4 (socket 0) -> TX P=1/Q=4 (socket 0) peer=50:00:00:00:00:02
Logical Core 54 (socket 0) forwards packets on 1 streams:
  RX P=1/Q=4 (socket 0) -> TX P=0/Q=4 (socket 0) peer=50:00:00:00:00:01
Logical Core 55 (socket 0) forwards packets on 1 streams:
  RX P=0/Q=5 (socket 0) -> TX P=1/Q=5 (socket 0) peer=50:00:00:00:00:02
Logical Core 56 (socket 0) forwards packets on 1 streams:
  RX P=1/Q=5 (socket 0) -> TX P=0/Q=5 (socket 0) peer=50:00:00:00:00:01
Logical Core 57 (socket 0) forwards packets on 1 streams:
  RX P=0/Q=6 (socket 0) -> TX P=1/Q=6 (socket 0) peer=50:00:00:00:00:02
Logical Core 58 (socket 0) forwards packets on 1 streams:
  RX P=1/Q=6 (socket 0) -> TX P=0/Q=6 (socket 0) peer=50:00:00:00:00:01

  mac packet forwarding packets/burst=32
  nb forwarding cores=15 - nb forwarding ports=2
  port 0: RX queue number: 7 Tx queue number: 7
    Rx offloads=0x0 Tx offloads=0x10000
    RX queue: 0
      RX desc=4096 - RX free threshold=32
      RX threshold registers: pthresh=0 hthresh=0  wthresh=0
      RX Offloads=0x0
    TX queue: 0
      TX desc=4096 - TX free threshold=32
      TX threshold registers: pthresh=0 hthresh=0  wthresh=0
      TX offloads=0x10000 - TX RS bit threshold=32
  port 1: RX queue number: 7 Tx queue number: 7
    Rx offloads=0x0 Tx offloads=0x10000
    RX queue: 0
      RX desc=4096 - RX free threshold=32
      RX threshold registers: pthresh=0 hthresh=0  wthresh=0
      RX Offloads=0x0
    TX queue: 0
      TX desc=4096 - TX free threshold=32
      TX threshold registers: pthresh=0 hthresh=0  wthresh=0
      TX offloads=0x10000 - TX RS bit threshold=32
testpmd> show port stats all

  ######################## NIC statistics for port 0  ########################
  RX-packets: 258        RX-missed: 0          RX-bytes:  24666
  RX-errors: 0
  RX-nombuf:  0
  TX-packets: 7          TX-errors: 0          TX-bytes:  2292

  Throughput (since last show)
  Rx-pps:            0          Rx-bps:            0
  Tx-pps:            0          Tx-bps:            0
  ############################################################################

  ######################## NIC statistics for port 1  ########################
  RX-packets: 258        RX-missed: 0          RX-bytes:  24666
  RX-errors: 0
  RX-nombuf:  0
  TX-packets: 7          TX-errors: 0          TX-bytes:  2292

  Throughput (since last show)
  Rx-pps:            0          Rx-bps:            0
  Tx-pps:            0          Tx-bps:            0
  ############################################################################
We need to initiate the Traffic Generator to see how packets are received and forwarded.
Running Trex to create some traffic⌗
We use TRex as a traffic generator.
From the previous cloned git repository:
$> cd trex
$> vim pods/trex.yaml
and edit the ’trex.yaml’ to configure the traffic generator
It is important to configure the Networks according to the peers (MAC addresses) configured on the Testpmd. ’trex.yaml`
apiVersion: v1
kind: Pod
metadata:
  annotations:
    k8s.v1.cni.cncf.io/networks: '[
      {
       "name": "sriov-nw-du-test-pmd-e810-ens4f0",
       "mac": "50:00:00:00:00:01",
       "namespace": "testpmd"
      },
      {
       "name": "sriov-nw-du-test-pmd-e810-ens4f1",
       "mac": "50:00:00:00:00:02",
       "namespace": "testpmd"
      }
    ]'
The ‘mac_telc0’ and ‘mac_telco1’ variables on the part of the script ’testpmd_addr.py’ , again, with the proper MAC addresses.
IPs are not important here, we are only using MACs
testpmd_addr.py: |
    # wild second XL710 mac
    mac_telco0 = '50:00:00:00:00:01'
    # we don’t care of the IP in this phase
    ip_telco0  = '10.0.0.1'
    # wild first XL710 mac
    mac_telco1 = '50:00:00:00:00:02'
    ip_telco1 = '10.1.1.1'
With everything configured, create the trex deployment:
$> oc -n testpmd apply -f pods/trex.yaml
configmap/trex-info-for-config created
configmap/trex-config-template created
configmap/trex-tests created
pod/trex created
Now, we will configure the ‘/etc/trex_cfg.yaml’.
Together with the deployment there is on script trying to make configuration automatically. But it seems is failing about detecting the ’latency_thread’, the socket and interfaces. So, double-check everything manually.
Mainly we need info about the CPUS and the Network interfaces:
$> oc -n testpmd rsh trex
sh-5.1# echo $PCIDEVICE_OPENSHIFT_IO_E810_ENS4F0
0000:86:01.5
sh-5.1# echo $PCIDEVICE_OPENSHIFT_IO_E810_ENS4F1
0000:86:09.6
sh-5.1# cat /sys/fs/cgroup/cpuset/cpuset.cpus
26-33,74-81
Use this information to double-check ‘/etc/trex_cfg.yaml’:
sh-4.4# cat /etc/trex_cfg.yaml
- port_limit: 2
  version: 2
  interfaces: ["0000:86:09.6","0000:86:01.5"]
  port_bandwidth_gb: 25
  port_info:
   - ip: 10.10.10.2
     default_gw: 10.10.10.1
   - ip: 10.10.20.2
     default_gw: 10.10.20.1
  platform:
   master_thread_id: 26
   latency_thread_id: 74
   dual_if:
     - socket: 1
       threads: [27,28,29,30,31,32,33,75,76,77,78,79,80,81]
Check the interfaces belongs to the PCI addressees of our VFs.
From the list of CPUs assigned to the Pod, we get the first CPU (26) and its sibling (74) as master/latency threads. We put these two CPUs out of the thread list.
Siblings can be obtained from inside the pod:
sh-5.1# cat /sys/devices/system/cpu/cpu26/topology/core_cpus_list
26,74
Important: Check the socket used by the CPUs and Network interfaces. In this example, all belong to socket: 1.
sh-5.1# lscpu -e
CPU NODE SOCKET CORE L1d:L1i:L2:L3 ONLINE
  0    0      0    0 0:0:0:0          yes
...
...
 24    1      1   24 32:32:32:1       yes
 25    1      1   25 33:33:33:1       yes
 26    1      1   26 34:34:34:1       yes
 27    1      1   27 35:35:35:1       yes
 28    1      1   28 36:36:36:1       yes
 29    1      1   29 37:37:37:1       yes
 30    1      1   30 38:38:38:1       yes
 31    1      1   31 41:41:41:1       yes
 32    1      1   32 42:42:42:1       yes
 33    1      1   33 43:43:43:1       yes
 34    1      1   34 44:44:44:1       yes
 35    1      1   35 45:45:45:1       yes
 36    1      1   36 48:48:48:1       yes
 37    1      1   37 49:49:49:1       yes
 38    1      1   38 50:50:50:1       yes
 39    1      1   39 51:51:51:1       yes
 40    1      1   40 52:52:52:1       yes
...
...
 94    1      1   46 60:60:60:1       yes
 95    1      1   47 61:61:61:1       yes
sh-5.1#
sh-5.1#  lspci -v -nn -mm -k -s ${PCIDEVICE_OPENSHIFT_IO_E810_ENS4F0}
Slot:    86:01.5
Class:    Ethernet controller [0200]
Vendor:    Intel Corporation [8086]
Device:    Ethernet Adaptive Virtual Function [1889]
SVendor:    Intel Corporation [8086]
SDevice:    Device [0000]
Rev:    02
Driver:    vfio-pci
Module:    iavf
NUMANode:    1
IOMMUGroup:    192

sh-5.1#  lspci -v -nn -mm -k -s ${PCIDEVICE_OPENSHIFT_IO_E810_ENS4F1}
Slot:    86:09.6
Class:    Ethernet controller [0200]
Vendor:    Intel Corporation [8086]
Device:    Ethernet Adaptive Virtual Function [1889]
SVendor:    Intel Corporation [8086]
SDevice:    Device [0000]
Rev:    02
Driver:    vfio-pci
Module:    iavf
NUMANode:    1
IOMMUGroup:    201
With everything configured, lets run trex server:
sh-5.1# ./t-rex-64 --no-ofed-check --no-hw-flow-stat -i -c 14
Starting Scapy server..... Scapy server is started
The ports are bound/configured.
Starting  TRex v3.00 please wait  ...
iavf_execute_vf_cmd(): Cmd 26 not supported
iavf_set_hena(): Failed to execute command of OP_SET_RSS_HENA
iavf_execute_vf_cmd(): Cmd 26 not supported
iavf_set_hena(): Failed to execute command of OP_SET_RSS_HENA
 set driver name net_iavf
 driver capability  : TCP_UDP_OFFLOAD  TSO  SLRO
 set dpdk queues mode to MULTI_QUE
 Number of ports found: 2
zmq publisher at: tcp://*:4500
 wait 1 sec .
port : 0
------------
link         :  link : Link Up - speed 25000 Mbps - full-duplex
promiscuous  : 0
port : 1
------------
link         :  link : Link Up - speed 25000 Mbps - full-duplex
promiscuous  : 0
 number of ports         : 2
 max cores for 2 ports   : 14
 tx queues per port      : 16
 -------------------------------
RX core uses TX queue number 65535 on all ports
 core, c-port, c-queue, s-port, s-queue, lat-queue
 ------------------------------------------
 1        0      0       1       0      0
 2        0      1       1       1    255
 3        0      2       1       2    255
 4        0      3       1       3    255
 5        0      4       1       4    255
 6        0      5       1       5    255
 7        0      6       1       6    255
 8        0      7       1       7    255
 9        0      8       1       8    255
 10        0      9       1       9    255
 11        0     10       1      10    255
 12        0     11       1      11    255
 13        0     12       1      12    255
 14        0     13       1      13    255
 -------------------------------
after some secs you will see something like:
Now, it is time to open a new console to run some packet’s simulation:
> oc rsh trex
sh-5.1#  ./trex-console

Using 'python3' as Python interpeter


Connecting to RPC server on localhost:4501                   [SUCCESS]


Connecting to publisher server on localhost:4500             [SUCCESS]


Acquiring ports [0, 1]:                                      [SUCCESS]

*** Warning - Port 0 destination is unresolved ***
*** Warning - Port 1 destination is unresolved ***

Server Info:

Server version:   v3.00 @ STL
Server mode:      Stateless
Server CPU:       14 x Intel(R) Xeon(R) Gold 5220R CPU @ 2.20GHz
Ports count:      2 x 25.0Gbps @ Ethernet Adaptive Virtual Function

-=TRex Console v3.0=-

Type 'help' or '?' for supported actions
Execute ’tui’ command to enter in a visual/dashboard with statistics of what is happening on the ports. Not very much should be happening yet.
Together with the deployment, it was included a python application that will make a packet simulation. Lets run the packet simulation on port 0, sending 1 million packets per second.
tui> start -f /opt/tests/testpmd.py -m 1mpps -p0
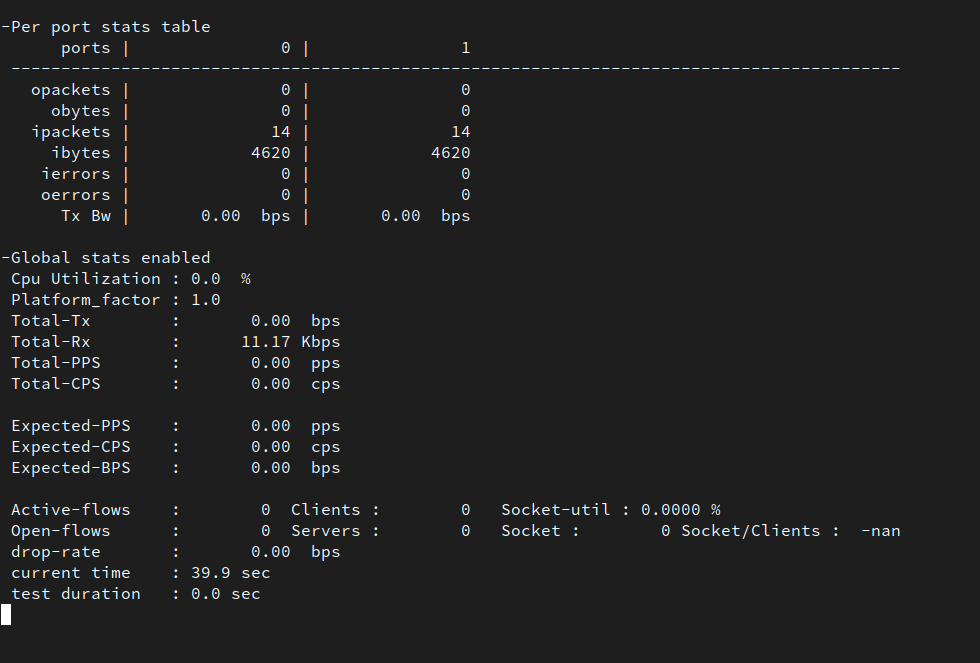
What is happening now?
The test application is sending packets through Trex Port 0, which is sending the packages to Testpmd Port 0. Then, Testpmd is configured to forward everything to Testpmd Port 1. From there, the packages are received by Trex Port 1.
You can see how Port 0 out-packets and Port 1 input-packets are mostly the same. Testpmd is doing ports forward correctly and the card seems to be working at the expected speed: 25Gb/s.
Summary⌗
For this tutorial, we have been working with the Intel E810 card. Pretty new card, which would not be compatible yet with all the environments. Using SNO4.10 and TRex 3.0 seems to be working properly. But it is important to notice, here, we only did a packets simulation (testing). All the real capabilities would not be supported.
To deploy and configure an SNO server, to run 5G RAN workloads, can be complex, specially the first time until you reach the proper configuration. Without a tool/methodology like ZTP GitOps this is not only complex, it would be difficult to use at scale.
In this tutorial, we have show an example to configure and have the server Ready to run DPDK applications (base for 5G RAN vDUs). After the testing, the configuration can be replicable and scalable in any number of different servers.
Once that you have a Siteconfig defining your first SNO, this can be replicated in your GitOps repo. Just needing to adapt the different IPs,MACs, and nodes naming. After that, the tuned PolicyGenTemplates will be applied configuring all the SNO.
In day-2 operations, if the configurations needs to be updated, this can be also done with the ZTP GitOps approach. Just making a change on a PolicyGenTemplate definition, it will automatically make the changes on all the selected servers. Modifying hundreds of servers is just a matter of making a new commit.
ToDo and future work⌗
In a second tutorial, we will go further about the different SCCs needed for running DPDK, and we will play with the different speeds of the card.